Guide to automated deployment
This article presents a guide to automated scripted deployment for a non-technical audience. It covers topics around software deployments, code deploy and the entire automated deployment pipeline. If you are interested in the technical details, this article also contains links to scripts you can try out.
skip to Deployment Environment Terminology or Deployment Process
The topics this article covers:
- What does deployment mean?
- Is automated deployment appropriate for clinical and healthcare systems?
- What are the benefits of deployment automation?
- Issues that Automated Deployment Solves
- Deployment Environment Terminology
- Deployment Process
- Deployment Script
- Deployment Trigger
What does deployment mean?
What does deployment mean in IT/ software dev? What is deploying software? What does it even mean?
Deploying code is a fancy term for updating code. Nothing too complicated. If we say, we are deploying the latest version of our code, then we are simply updating the current code, to the latest version of the code.
Automating the ‘deployment’ of code, simply means we are updating our code, using an automated technique. In this case, we often mean running a script. The script, will often times, contains commands that would be run manually by a user, if deploying (updating code) by hand.
An automated deployment is what enables you to deploy your software to test, stage and production environments with the flick of a switch. Automation is an essential part of the effective operation of software delivery life cycle.
Is automated deployment appropriate for clinical and healthcare systems?
According to MHRA / GCP, appropriate controls of the system are in place throughout the systems lifetime. The system is fit for purpose and performs reliably and consistently as intended. Computer systems should be periodically evaluated to confirm that they remain in a valid state and are compliant. This should include:
- current range of functionality
- deviations records
- incidents
- problems
- upgrade history
- performance
- reliability
- security
- validation
[14.5.1 Validation Principles. MHRA Grey Guide] [EudraLex The Rules Governing Medicinal Products in the European Union Volume 4 Good Manufacturing Practice Medicinal Products for Human and Veterinary Use Annex 11: Computerised Systems – Equivalent to FDA 21CFR11]
Upgrade history is the key item from this list that automated deployments aims to provide a compliant solution in-line with regulatory restrictions and guidelines.
What are the benefits of deployment automation?
This section covers the numerous benefits of automated deployment. If you have any others, please reach out and get in touch.
The main benefits come from reducing the possibility of errors because manual deployment is error-prone. Any process involving human input introduces the possibility of errors and defect in the final product. Repetitive manual deployment tasks can harm employee morale. Computer are good at repetitive tasks, human are good a creativity, like solving code problems. Saving time as manual deployment is very time-consuming. Developers within the team can otherwise spend their time working on improving the application. Consistency and repeatability, once and automated deployment is configured, then 99.9% of the time (famous last words!!) the process is the same every time. This process contributes to more frequent and stable releases, and produces high consistency and greatly assists in diagnosis of errors as it reduces the possible variables, like human mistakes.
In terms of audit and compliance:
- Reproducible
- Traceable
- Evidenced
- Transparent
- Maintain separated concerns (devs don’t need server login).
- Reduces defects (caused by human error)
- Anyone can deploy
- Audit Trail
In terms of software quality improvement:
- More frequent releases
- Immediate feedback (deployment is faster)
- Smaller code changes are simpler
- Reduced errors
- Fault isolation is simpler
- Increased productivity
- Faster and more efficient deployment
Issues that Automated Deployment Solves
This section lists some of the issues that automated deployment solves:
- Increased cost of producing software
- Poor Code Quality
- Meaningless Work
- Time wasting
- Developers vs. Server Admin wars
- No runtime version management
- Long Feedback Loops
- any more?…
Deployment Environment Terminology
It is important, before we cover the important aspects of automated deployment, we understand certain terminology in the deployment chain.
I am mainly going to focus on environment terminology. There is a lot of other terminology, but it is not relevant in this particular context.
What is an environment?
An environment is a term used for a ‘place’ where code resides. The type of environment, dictates (or should dictate) the state of the code, when it is in this ‘place’. The term environment, is sometimes shortened to ‘env’.
Example; A ‘play’ environment, we would expect unstable code, and any changes are not going to dangerous/ detrimental. Where as; A ‘real’ environment, we would expect stable code, and any changes to have real world consequences.
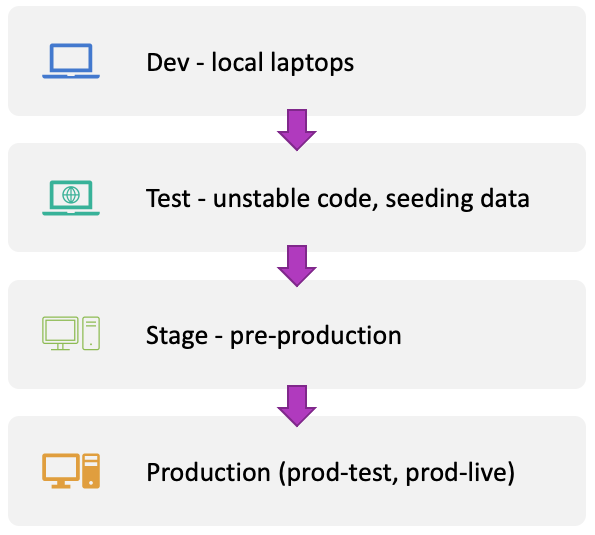
Deployment Environments
- Dev / local This is our laptops/ desktops/ work stations
- Used by developers
- No real data (seed data)
- Test Server used for multi user testing
- Used by developers and QA
- No real data (seed data)
- Stage Known as pre-production. The place we get to do any final tests, before deployment to a ‘real world’ production environment.
- Used by developers, QA and End Users.
- Sanitized/limited real data
- Production Stable code, used by ‘real world’ end users.
- production-test
- production-live
Now that we have the deployment environment terminology out of the way, we can cover two the deployment process.
Deployment Process
In this section, I will cover the deployment process. There are two important aspects of the automated deployment process. The first, is the deployment script. The second is the deployment trigger. This section will explain both these aspects which will be aimed at a mixed audience, I will not cover in-depth technical details. For more in-depth detail you can read more about the deployment script and deployment trigger in the respective technical articles.
Deployment Script
In this section I aim to cover the main aspects of the deployment script. This will be in such a way that is accessible to a mix audience. If you are interested in the technical details, I have a more in-depth article on this deployment script, which you can read more about.
The part of the deployment script we are interested in, is the main function. You don’t have to understand bash/ shell programming to follow along.
The main function detects the environment the script is being run on. The four types of environment are:
- Dev / Local
- Test
- Stage
- Prod
I will explain the deployment for each of these environments in turn.
Dev / Local Env
The dev / local deployment script is used for testing only. This is the environment that is used on your local laptop / desktop. For technical audience; I actually mount the deploy directory and execute this script on my docker container and test the deployment script works as expected. For non technical audience, all you need to know, is this environment is used only for testing.
I will move on to explain the test env, as this is a good point to explain what is happening.
    if [ $env = "local" ]; then
        echo "-local (dev)"
        func_updateCode;
        func_buildDev;
        func_dataSeed;
        func_updateLive;
        func_clearCache;
Test Env
The block of code shown below presents what happens if the test env is detected.
    elif [ $env = "test" ]; then
        echo "-test"
        func_updateCode;
        func_buildDev;
        func_maintenanceMode true;
        func_dataSeed;
        func_updateLive;
        func_clearCache;
        func_maintenanceMode false;
The first function that is run is updateCode. This goes away, and grabs the latest code from github, downloads to a temporary directory. The key here, is downloading to a temporary directory, not a live one that is being served to users.
The next function is buildDev. This function does anything that needs to be done for the application to work correctly. This can be tasks like download library, check settings and create css and js. The key here, is that we use the buildDev function, which means we build for a development application. In reality, this means we would not compress css or js, and we install any library and supporting applications like performance monitors or profilers, that will help with debugging.
Once we have grabbed the latest code, built our application, we then turn the current application into maintenance mode. What this does will differ depending on your application, but, in essence. It will display a message to users, saying something like “application going down for maintenance”.
Depending on your application, you can use this function to display a timer to users to save and logout. You can then sleep this script, or wait, until the specified time is over, and then proceed.
Once maintenance mode is enabled, I then run a function called dataSeed which deletes the entire test database, and restored all tables from scratch, and then populates with some seeding data. This seeding data contains a standard set of users with fixed passwords (Adam Admin and the gang). The seeding also populated with application data, so that users will see information displayed, and can interact/test the application.
Once we have completed the database part of the deployment, we then move on to updating the code. We run the updateLive function to do this. The code we downloaded from github, and then built, is copied to the main directory that is served to users. We use rsync to only copy changes, and speed up the process.
Once the new files are copied, we then clear any cache and storage that might contain information on the old application. This is done by running the clearCache function. Once this is done, we can then disable maintenance mode, and bring up the application.
Stage Env
The block of code below shows the set of instructions running on the staging environment. You will notice, most of the command are the same as the test environment. The main difference is buildProd and dataRestore functions.
	elif [ $env = "stage" ]; then
        echo "-stage"
        func_updateCode;
        func_buildProd;
        func_maintenanceMode true;
        func_dataRestore;
        func_updateLive;
        func_clearCache;
        func_maintenanceMode false;
The buildProd command is largely similar to the buildDev command explained above, but this time, we build the application for the production setting. This means compressed css and js, along side restricting libraries to production only. Settings will also be configured for production, this is most likely will be non verbose output for errors etc.
The dataRestore function replaces the dataSeed function, but does, largely, configured the same aspect, which is the database. As explained above, the dataSeed effectively deletes the database, and then populates with seeding data. In contract, the dataRestore that is used in the stage env, restores a sanitized production database. This means that testing can highlight problems/issues around edge cases from real world usage.
The remainder of the script is the same as I have previously explained above.
Production Env
The block of code below shows the set of instructions running on the production environment. The instructions are similar to the staging, as the staging is trying to replication production. Staging in known as pre-production. What is different for the production instructions, is a backup function backupLive. This backups up the production code and database before we copy new files. You will also notice, we do not do any database changes, as this is a production machine, so we don’t want to mess with the data.
    elif [ $env = "prod" ]; then
        echo "-prod"
        func_updateCode;
        func_buildProd;
        func_maintenanceMode true;
        func_backupLive;
        func_updateLive;
        func_maintenanceMode false;
Main Function
The full function containing a set of all of the above deployment environments is shown below. If you want more technical details, they can be found in this technical article on bash script for deployment
# Function main()
#  Detects env and deploys accordingly.
func_main(){
    echo "-Main"

    if [ $env = "local" ]; then
        echo "-local (dev)"
        func_updateCode;
        func_buildDev;
        func_dataSeed;
        func_updateLive;
        func_clearCache;
    elif [ $env = "test" ]; then
        echo "-test"
        func_updateCode;
        func_buildDev;
        func_maintenanceMode true;
        func_dataSeed;
        func_updateLive;
        func_clearCache;
        func_maintenanceMode false;
    elif [ $env = "stage" ]; then
        echo "-stage"
        func_updateCode;
        func_buildProd;
        func_maintenanceMode true;
        func_dataRestore;
        func_updateLive;
        func_clearCache;
        func_maintenanceMode false;
    elif [ $env = "prod" ]; then
        echo "-prod"
        func_updateCode;
        func_buildProd;
        func_maintenanceMode true;
        func_backupLive;
        func_updateLive;
        func_maintenanceMode false;
    else
        echo "Failure: ENV not set" >&2
        echo "Exiting!!!" >&2
        exit 1
    fi

    echo "-Done"
}
Deployment Trigger
In this section I aim to cover the main aspects of the deployment trigger. This will be in such a way that is accessible to a mix audience. If you are interested in the technical details, I have a more in-depth article on this deployment trigger, which you can read more about.
The deployment trigger is the task of running our deployment script. In the setting I will explain here, we use github actions to trigger our deployment script.
Lets first discuss what a basic github action does, and how this can trigger our deployment script.
As you can see from this github actions script, it has a name of ‘deploy mybranch’. It is triggered when there is a push to branch ‘mybranch’. Effectively, when there is a change to the code on ‘mybranch’, this script will be triggered. The jobs section, will run any jobs you want. In this script, you can see, I have simply stubbed a build, test, and deploy section.
name: deploy mybranch

on:
  push:
    branches:
      - mybranch

jobs:
  # Build

  # Test

  # Deploy
The build and test sections would be used to first build the application, and then run the automated unit, integration, UAT tests. This happens before we run the deployment, if any problems with build or test, we would not progress to deployment.
As you can see from the code block below, it shows how we can use a github action to trigger our deployment script. This github action, is triggered on push/change to ‘mybranch’, the deploy section, then connect to our server, and triggers the deploy script (as covered in the previous section above).
name: deploy mybranch

on:
  push:
    branches:
      - mybranch

jobs:
  # Build

  # Test

  # Deploy
  - name: Install SSH Key
    uses: shimataro/ssh-key-action@v2.1.0
    with:
      key: $
      known_hosts: $
  - name: Execute deployment Script
    run: ssh username@myserver.com "cd application/$-Deploy && pwd && ./deploy.sh"
Env Triggers
We actually have github action triggers setup for our test, stage and production deployment environments.
The trigger script for test and stage is the same. Only difference, is the server that the deployment script is triggered on.
Test Env Trigger
Here is the github script for the test environment.
name: deploy svr-test

on:
  push:
    branches:
      - svr-test

jobs:
  # Build

  # Test

  # Deploy
  - name: Install SSH Key
    uses: shimataro/ssh-key-action@v2.1.0
    with:
      key: $
      known_hosts: $
  - name: Execute deployment Script
    run: ssh username@myserver.svr-test.com "cd application/$-Deploy && pwd && ./deploy.sh"
Stage Env Trigger
Here is the github action script for the stage environment.
name: deploy svr-stage

on:
  push:
    branches:
      - svr-stage

jobs:
  # Build

  # Test

  # Deploy
  - name: Install SSH Key
    uses: shimataro/ssh-key-action@v2.1.0
    with:
      key: $
      known_hosts: $
  - name: Execute deployment Script
    run: ssh username@myserver.svr-stage.com "cd application/$-Deploy && pwd && ./deploy.sh"
Production Env Trigger
The github action trigger script for the production environment is slightly different to the one for test and stage.
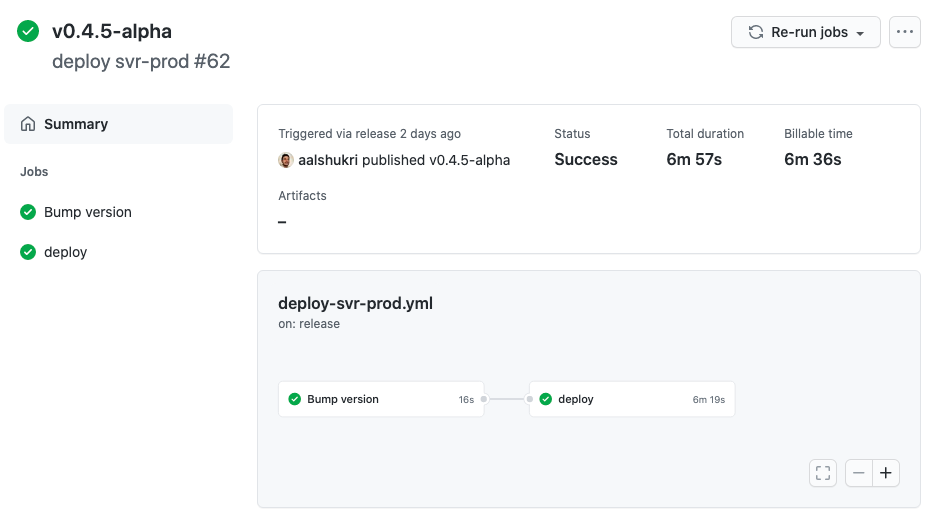
First thing, is the production action is triggered when we cut a new release on the svr-prod branch. This means, we first update code on the svr-prod branch, we then create a new release, once completed, this will kick off the github action.
The second thing, is the version bump script. This part of the script will increment the version of the production application automatically. It pulls the version number from the latest release in github, writes to a file. This can then be displayed within the application.
The final aspect, is that we deploy to both the production test (prod-test) and the production live (prod-live) within the last part of this script.
name: deploy svr-prod

on:
  release:
    types: [published]

jobs:
  # Test

  # Build

  # Bump version
  # After successful test and build, then bump version before deployment.
  version-bump:
    runs-on: ubuntu-latest
    name: Bump version
    steps:
      - name: Checkout
        uses: actions/checkout@v2
        with:
          ref: svr-prod
      - name: Update version and commit
        run: |
          date > code/latest-release.txt
          targetConfigFile="config/version.txt"
          git fetch --prune --unshallow
          oldVersion=$(awk '{print $6}' $targetConfigFile)
          newVersion="'"$(git describe --tags --abbrev=0 --always)"'"
          echo "Bumping..."
          echo " Old Version = "$oldVersion
          echo " New Version = "$newVersion
          awk '{$6 = "'$newVersion'"; print}' $targetConfigFile > $targetConfigFile".tmp" \
          && mv $targetConfigFile".tmp" $targetConfigFile
          echo "Done."
          git config user.name github-actions
          git config user.email github-actions@github.com
          git add .
          git commit -m "Robot Commit: Auto version bump on svr-prod deploy"
          git push

  # Deploy
  deploy:
    needs: version-bump
    runs-on: ubuntu-18.04
    steps:
      - name: Install SSH Key
        uses: shimataro/ssh-key-action@v2.1.0
        with:
          key: $
          known_hosts: $
      - name: Execute deployment Script
    	run: ssh username@myserver.svr-prod.com
    	 "cd application-prod-test/$-Deploy
    	 && ./deploy.sh"

    	run: ssh username@myserver.svr-prod.com
    	 "cd application-prod-live/$-Deploy
    	 && ./deploy.sh"
Triggering Github Action
In the previous section, I explained how we trigger a github action. We use triggers on push, which runs when there is a change on a specific branch (svr-test, svr-stage). We also use on publish, which triggers when there is a new release cut on a specific branch (svr-prod).
Once an action has run, we can see if the action has completed successfully, or has failed.
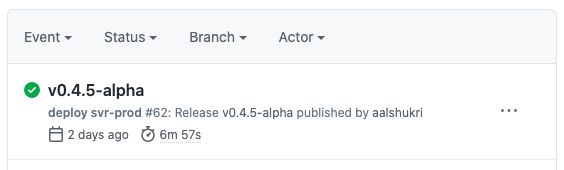
The output of the deployment script is stored within github, as the trigger stays connected via ssh to the server, and stores all output. We also store the output on the server itself. Both these log files are perfect for traceability and audit.