Laravel Jetstream Tutorial: How to create new pages and components

This article presents a guide for customising your basic Laravel Jetstream installation. In particular, this tutorial covers the questions like How do you create a new page in Jetstream? How do you build a Jetstream component?
If you are unsure what Laravel is, you can read more about Laravel here. If you want to get a basic Laravel Jetstream application up and running, so you can follow this tutorial, you can read this guide here.
How do you build a Jetstream component?
To modify you need to know
- laravel blade components.
- tailwind css
What is the process to add a new page to Laravel Jetstream? We are going to add a component to the application.
The basic process is to execute the command below to create the two files you need.
> php artisan make:component MyComponent
Executing this command, will create two files for you.
www/app/View/Components/MyComponent.php www/resources/views/components/my-component.blade.php
If you open the my-component.blade.php you will see something like below.
<div>
    <!-- Knowing is not enough; we must apply.
	Being willing is not enough; we must do.
		- Leonardo da Vinci -->
</div>
Uncomment this quote, or write your own text.
<div>
    Knowing is not enough;
	we must apply.
	Being willing is not enough;
	we must do.
		- Leonardo da Vinci
</div>
Now you are free to use you new component by inserting the tag <x-my-component></x-my-component>.
You can try this out by simple inserting this tag into the welcome or dashboard blades.
/resources/views/welcome.blade.php
/resources/views/dashboard.blade.php
How do we create a new page with link on the menu? I will create a help page to show how I did this.
How do add a new page to Laravel Jetstream
We are going to add a help page to the application. This will be done in three steps.
- Create the route
- Create the view blade
- Add link to menu
Create the route
Open the file /routes/web.php. We want to add a block of code to direct us to the newly created help page.
To test if the route is working correctly, you can simply return the words ‘help’ using this command return 'help';
Route::middleware(['auth:sanctum', 'verified'])
 ->get('/help', function () {
    return 'help';
})->name('help');
Once you created your route, if you get a 404, you might need to issue this command to clear the routes. > php artisan route:clear
You can navigate to http://localhost:8080/help (if using my docker setup) to make sure everything is working ok.
Once you are happy, this is the final block of code to use, which will return the help view. (we simply swapped return 'help'; for return view('help');)
Route::middleware(['auth:sanctum', 'verified'])->get('/help', function () {
    return view('help');
})->name('help');
Create the view blade
In this example, we want to create a single view, that has two components. The components we want to create on our help page, will be ‘guide’ and ‘support’.
We execute the command below to create the two files you need for the ‘guide’ component.
> php artisan make:component Guide
Executing this command, will create two files for you.
/app/View/Components/Guide.php /resources/views/components/guide.blade.php
The component file, will look like this /app/View/Components/Guide.php
<?php

namespace App\View\Components;

use Illuminate\View\Component;

class Help extends Component
{
    /**
     * Create a new component instance.
     *
     * @return void
     */
    public function __construct()
    {
        //
    }

    /**
     * Get the view / contents that represent the component.
     *
     * @return \Illuminate\Contracts\View\View|\Closure|string
     */
    public function render()
    {
        return view('components.guide');
    }
}
The blade file, will look something like this /resources/views/components/guide.blade.php
<div>
    <!-- Knowing is not enough; we must apply. Being willing is not enough; we must do. - Leonardo da Vinci -->
</div>
You can modify this file guide.blade.php to display some text. Simply removing the comments from the quote is enough at this stage.
<div>
Knowing is not enough; we must apply. Being willing is not enough; we must do. - Leonardo da Vinci
</div>
Repeat this process for the support component.
> php artisan make:component Support
Executing this command, will create two files for you, as above.
/app/View/Components/Support.php /resources/views/components/support.blade.php
Again, the only one we want to modify at this stage is the support.blade.php located in folder /resources/views/components/. The file can be something like below:
<div>
    An unexamined life is not worth living. - Socrates
</div>
Now we have our two components, guide, and support. We want to create our help page, which will contain there two components.
Create a file /resources/views/help.blade.php
Add the content below
<x-app-layout>
    <x-slot name="header">
        <h2 class="font-semibold text-xl text-gray-800 leading-tight">

        </h2>
    </x-slot>

    <div class="py-12">
        <div class="max-w-7xl mx-auto sm:px-6 lg:px-8">
            <div class="bg-white overflow-hidden shadow-xl sm:rounded-lg">
                <x-guide />
            </div>
        </div>
    </div>

    <div class="py-12">
        <div class="max-w-7xl mx-auto sm:px-6 lg:px-8">
            <div class="bg-white overflow-hidden shadow-xl sm:rounded-lg">
                <x-support />
            </div>
        </div>
    </div>
</x-app-layout>
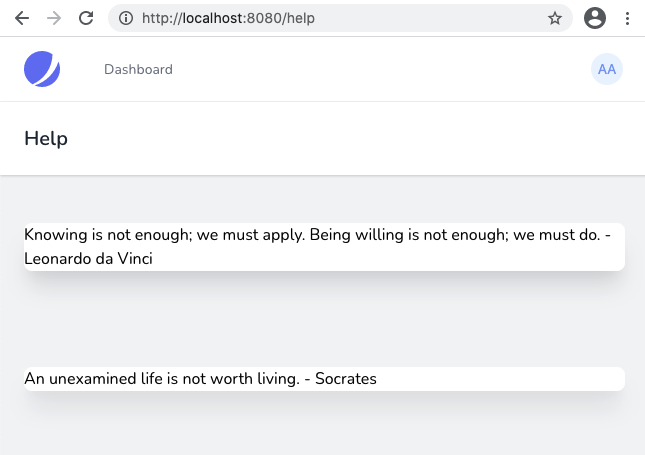
you will notice, in our help blade, we are calling two components. The guide component is called using the line <x-guide />. The support component is called using the line <x-support />.
This should render the help page if you navigate to http://localhost:8080/help
If you are having trouble viewing the page you just created, you can try to clear the view cache.
> php artisan view:clear
The last step, we want to modify the navigate menu blade, to add the link to the menu to get to our new page.
Add link to menu
Add the link to the Navigation menu blade Navigate to this file /resources/views/navigation-menu.blade.php
You should see this section of code on lines 13-18.
<!-- Navigation Links -->
<div class="hidden space-x-8 sm:-my-px sm:ml-10 sm:flex">
   <x-jet-nav-link href="" :active="request()->routeIs('dashboard')">

     </x-jet-nav-link>
</div>
We want to simply add a block of code to this navigation links part. As I want adding a help page, I added the following code block for a help page.
                <div class="hidden space-x-8 sm:-my-px sm:ml-10 sm:flex">
                    <x-jet-nav-link href="" :active="request()->routeIs('help')">

                    </x-jet-nav-link>
                </div>
The full navigation link block should look like this
                <!-- Navigation Links -->
                <div class="hidden space-x-8 sm:-my-px sm:ml-10 sm:flex">
                    <x-jet-nav-link href="" :active="request()->routeIs('dashboard')">

                    </x-jet-nav-link>
                </div>
                <div class="hidden space-x-8 sm:-my-px sm:ml-10 sm:flex">
                    <x-jet-nav-link href="" :active="request()->routeIs('help')">

                    </x-jet-nav-link>
                </div>
                <!-- \Navigation Links -->
Now, you should see the help link on the navigation menu.
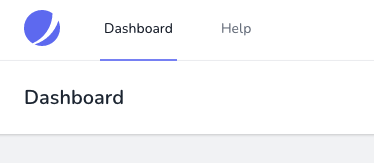
All done. You should now see your new help page with guide and support components.
Further Laravel Resources
Some other resources which might be of use once you have started with Laravel can be found in the list below: